
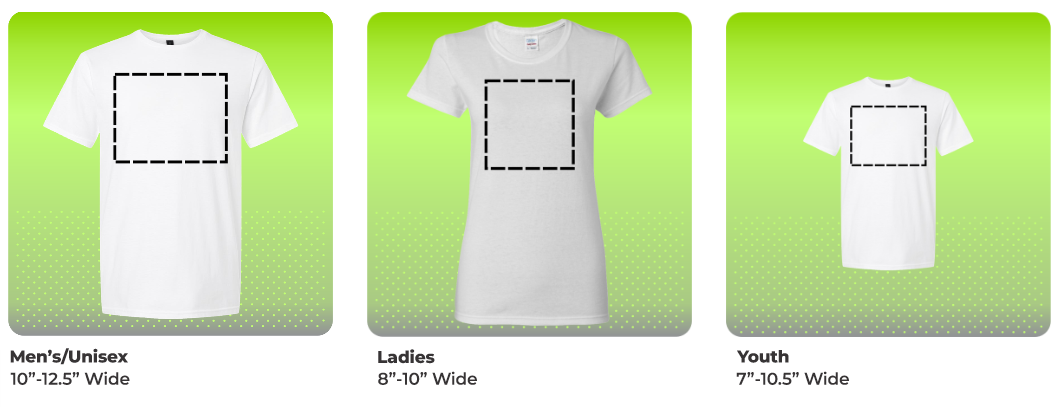
Suggested Sizing & Spot-On Placement
Placement That Pops
You know the classic advice: measure twice, cut once? Well in our world, it's measure twice, apply once. Whether you’re printing for a spirit wear fundraiser or building out a streetwear drop, proper sizing and placement matter.
Best practice? Measure your garments before you order your custom transfers. It doesn’t have to be fancy - a ruler, measuring tape, copy paper, or even a piece of string will do. Cut paper to the size of your artwork and lay it on the garment to see how it’ll look. That physical preview can save a ton of second-guessing later.
Size It Right, Style It Bold
Let’s be real: sizing is mostly about preference. There are industry standards, yes, but those are just a starting point. Don't let your supplier choose your sizing for you. Think about your customers. What’s trending? Oversized? Cropped? Fitted? Your transfer supplier (that’s us!) can recommend some general go-to sizes, but your eye and your brand vision matter most.
If you need to place your transfer order before your blanks arrive, check the garment specs online. Distributors or manufacturers often list chest width and length measurements.
Full Front
Placement: Start 2-3 fingers down from the collar to the top of the design. It may feel high but trust us, you don’t want a belly print.

💡 Pro Tip: When printing for a mix of youth and adult sizes, base your print size on the smallest shirt in the order that still works for the whole range. A print that's slightly oversized on a youth shirt will look better than a tiny print on an XL.
Trending & Unique Placements:
➤ Along the bottom hem or hip line
➤ Small print on lower back corner
➤ Collar-following arch prints
➤ Cuffs or sleeve ends
➤ Inside the hood or on the outside of the hood
Full Back
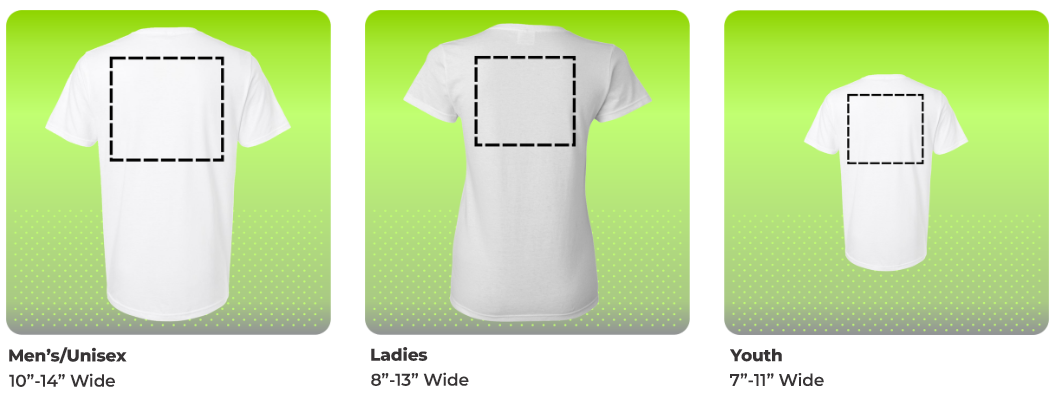
Placement: Imagine a line across from the middle of each sleeve opening, apply the top of the transfer along that line. For hoodies or long hair, shift the print slightly lower to account for hoods and hair coverage.
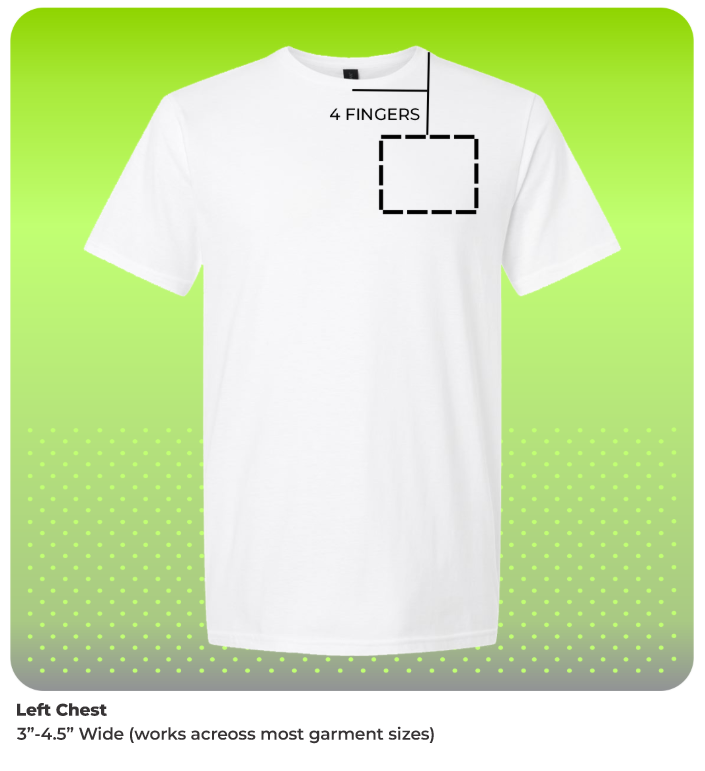
Heart / Left Chest
How to Place It:
Start by dropping an imaginary line straight down from the collar’s outer edge - that’s your center guide. Next, measure about four fingers down from the collar, and line the top edge of your design to that point. This method keeps your print comfortably positioned and looking balanced.
Not sure it’s right? Another visual cue: check that your print sits centered in line with the lower third of the sleeve opening.
Pro Tip: Polos, V-necks, and other unique necklines can throw you off. If you're unsure, tape the design (or even a paper cutout) in place while someone’s wearing the garment. Adjust until it looks right, then use that spot as your guide. It's more accurate than measuring flat on the table - and gives you a better sense of how the design will actually wear.
Sleeve Prints
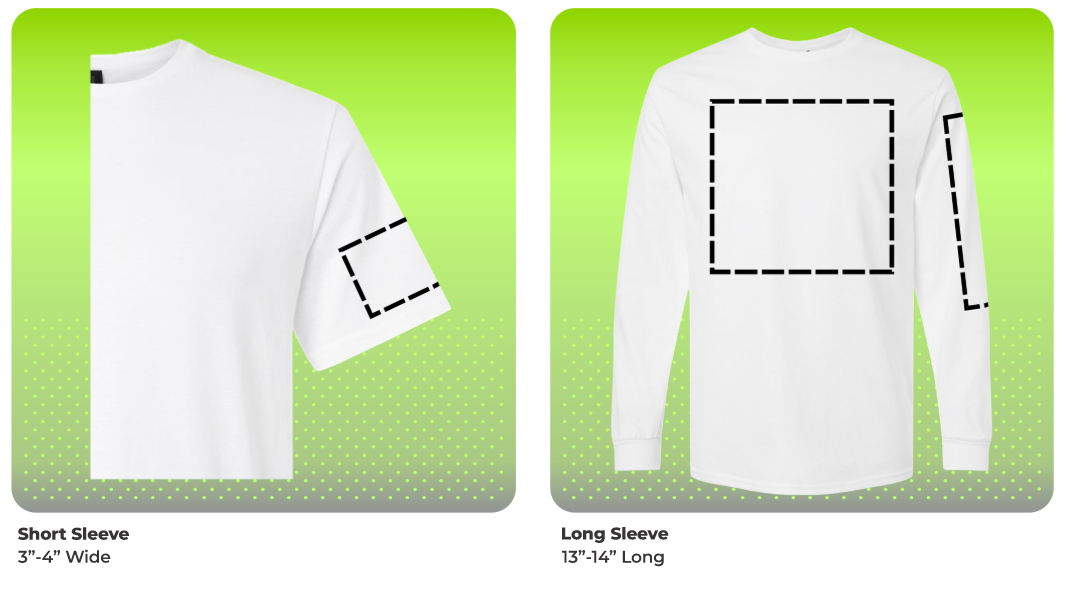
Short Sleeve Placement: Centered vertically on the sleeve, aligned with a line dropping from the shoulder seam.
Long Sleeve Placement: Running vertically down the sleeve. It can be placed closer to the cuff for trendier looks.
Cap & Hat Prints
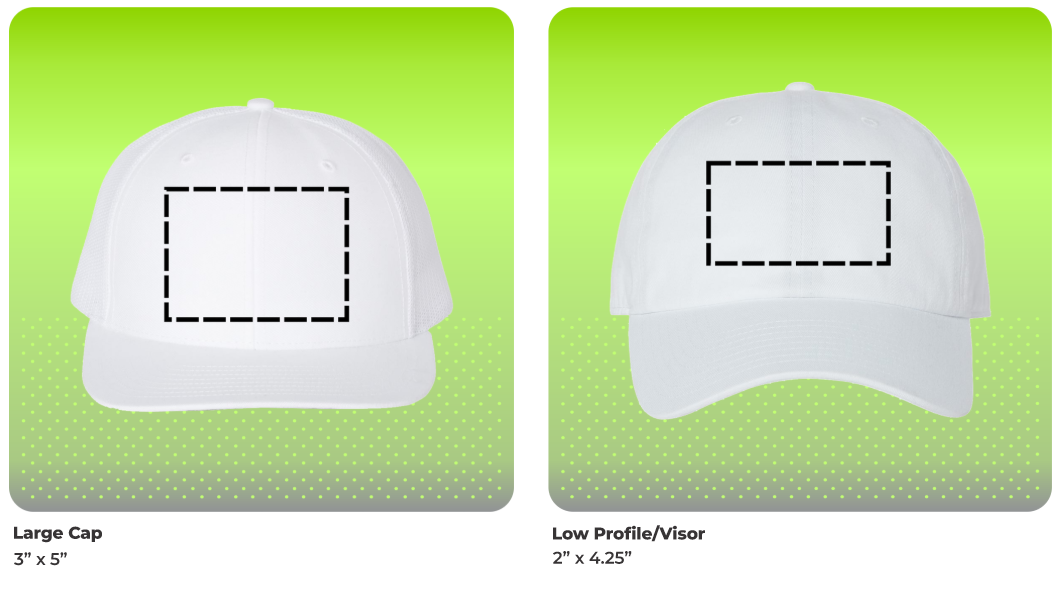
Placement Tips: Five-panel caps are ideal for decoration - no center seam to battle. But if you must go over a seam, our colorVIBE DTF and colorVIBE Hybrid transfers are built to handle it without cracking or lifting.
Trending & Unique Placements:
➤ Off-center left or right
➤ Under the bill (great for surprise details!)
➤ Side panels
➤ Multiple overlapping logos
Neck Labels & Yoke
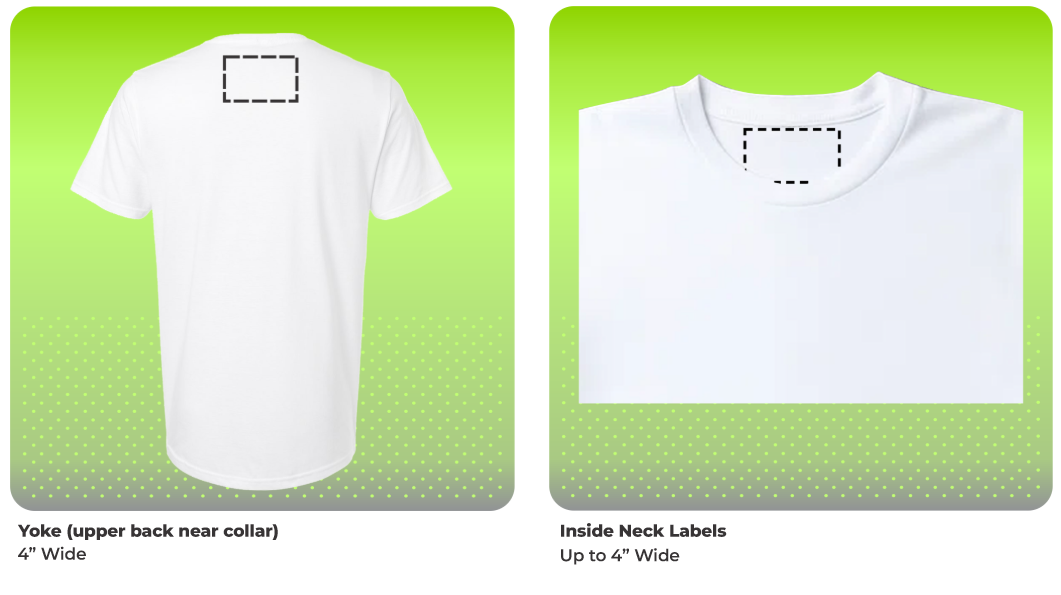
Placement Tip: Bigger tags are easier to apply and read. Don’t shrink it just because it’s a label!
Joggers & Sweatpants
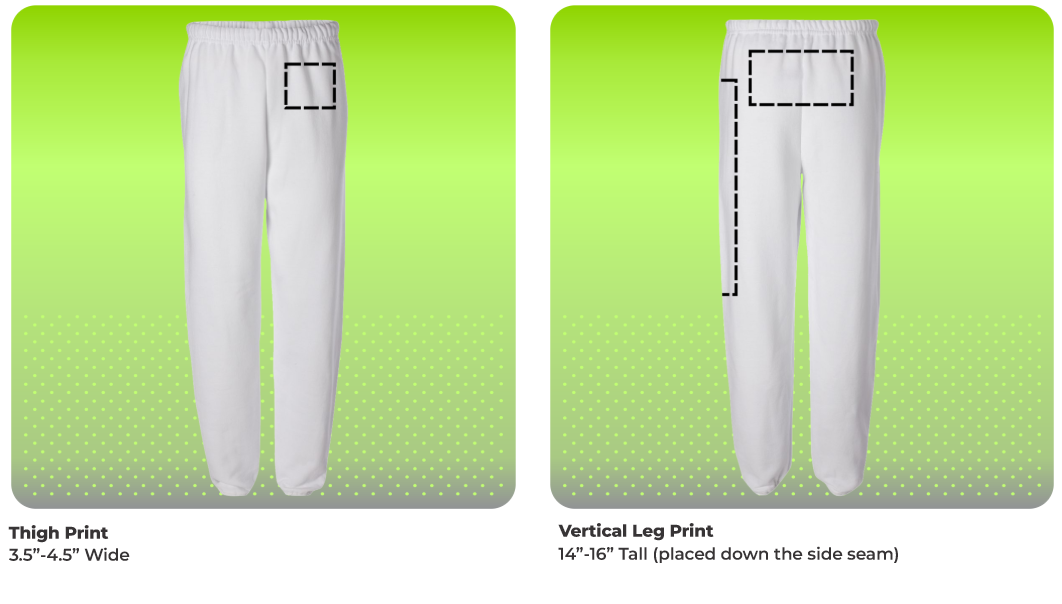
Additional Placement Ideas:
➤ Down the outer leg - great for team names or branding
➤ Above the cuff for mini logos or sayings
➤ Across the back waistline/butt print (for bold streetwear vibes)
Leggings
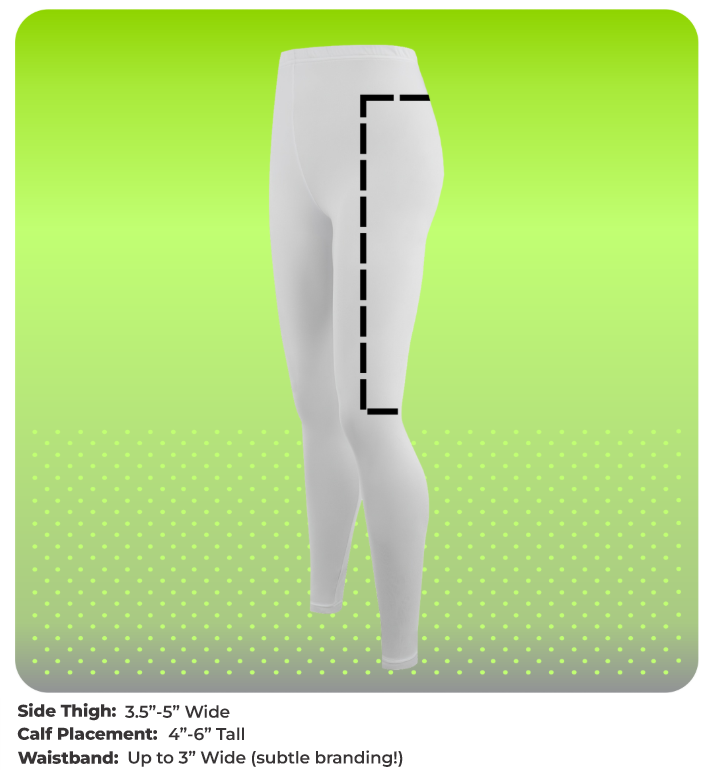
Placement Tips: Use paper templates to preview. Leggings stretch, so don’t go too big.
Shorts
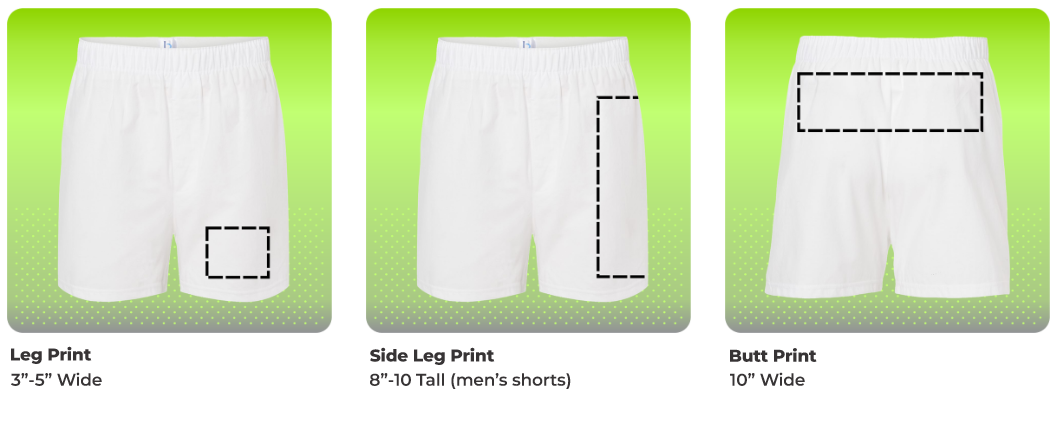
Fun Placements:
➤ Down the side of the leg
➤ Diagonal on one leg
➤ Overlapping logos near the hem
➤ Matching mini front and back prints
Skirts & Skorts
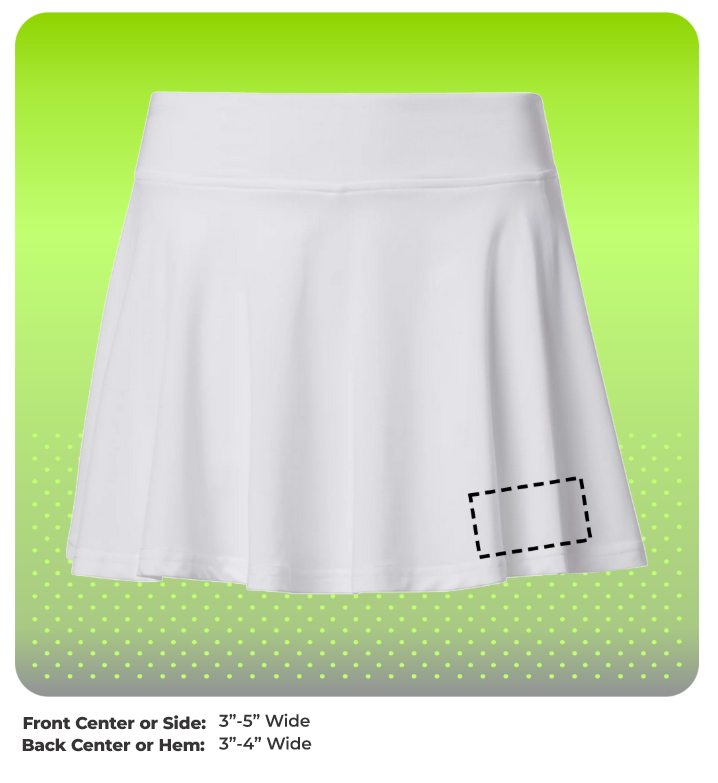
Trend Tip: Printed athletic skorts are hot in team sportswear. Coordinate prints with tops for a full custom look.
Heat Pressing & Prepress Tips
Prepress Like a Pro: A quick 3 second prepress removes moisture and wrinkles, giving your transfer the best shot at bonding properly. Don’t skip it, especially on 100% cotton garments.
Mind Your Seams & Zippers: Seams, zippers, buttons, and hoodie pockets can cause uneven pressure during application. Use a heat press pillow or a mouse pad to raise the print area above any bulky seams.
Steady Pressure = Happy Prints: Firm, even pressure is the key to long-lasting results. If your press is manual, adjust the pressure until it takes real effort to close it with one hand.
Final Tips
Placement and sizing aren’t just technical, they’re creative decisions. Follow the general rules, then break them to match your brand. Use this guide as your baseline but always trust your eye and what your audience loves.
Need help deciding on placement? Want to test something new? Reach out. Our team’s seen everything and we’re here to help you nail every custom piece you print.
